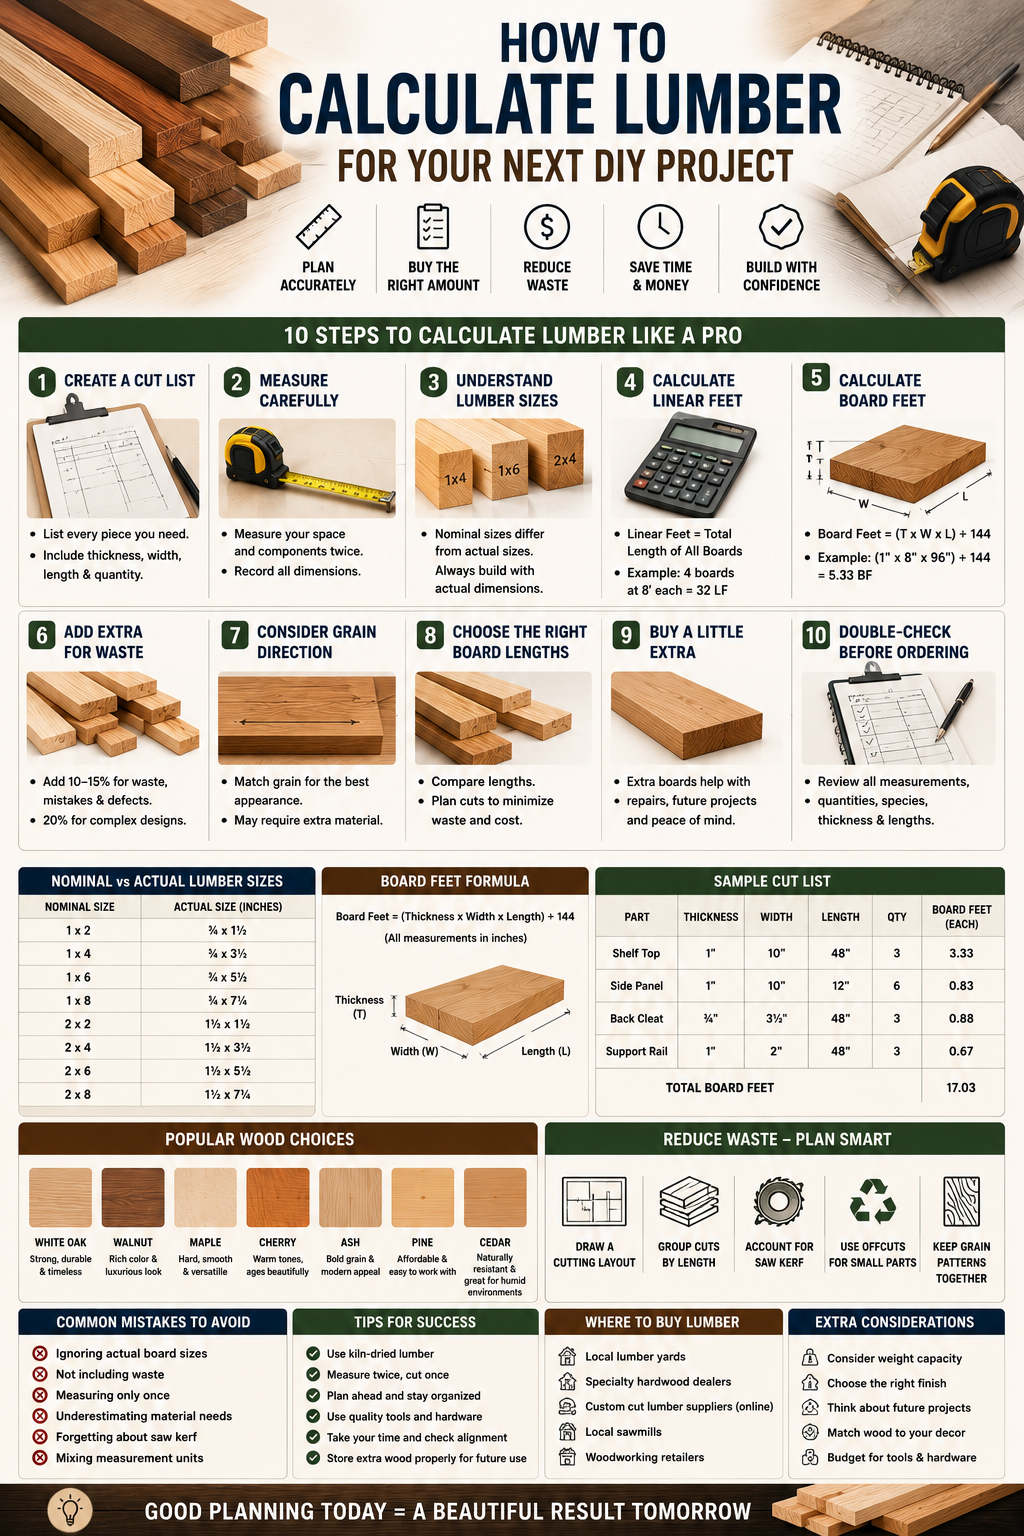
How to Calculate Lumber for Your Next DIY Project
How to Calculate Lumber for Your Next DIY Project
To calculate lumber for a DIY project, start by creating a detailed cut list that includes the length, width, thickness, and quantity of every piece you'll need. Add the total linear footage or board footage, then include an extra 10–15% for waste, mistakes, and grain matching. Careful planning helps you buy the correct amount of lumber, stay within budget, and avoid unnecessary trips to the lumber yard.
Why Lumber Calculations Are Important
One of the most common mistakes DIYers make is buying either too much or too little wood.
Buying too little can delay your project and may result in boards that don't perfectly match the original purchase. Buying too much increases costs and leaves you with unnecessary offcuts.
Learning how to estimate lumber accurately helps you:
Stay within your budget
Reduce material waste
Finish projects faster
Improve project planning
Avoid unnecessary store visits
Make better use of premium hardwood
Whether you're building floating shelves, a dining table, custom cabinets, or a handcrafted barn door, accurate calculations are the foundation of a successful project.
Step 1: Create a Detailed Cut List
Before purchasing lumber, write down every wooden component your project requires.
For each piece, include:
Length
Width
Thickness
Quantity
For example:
PartThicknessWidthLengthQuantityShelf Top1 in10 in48 in2Shelf Side1 in10 in12 in2Support Rail1 in2 in48 in2
A complete cut list prevents forgotten pieces and makes estimating much easier.
Step 2: Measure Everything Carefully
Always measure your project space before purchasing materials.
Check:
Wall width
Wall height
Floor-to-ceiling height
Door openings
Window openings
Existing trim
Clearance around obstacles
Measure twice and record every dimension before placing an order.
Step 3: Understand Lumber Dimensions
Lumber is commonly sold using nominal sizes rather than its actual finished dimensions.
For example:
Nominal SizeApproximate Finished Size1 × 4¾ × 3½ inches1 × 6¾ × 5½ inches1 × 8¾ × 7¼ inches2 × 41½ × 3½ inches2 × 61½ × 5½ inches
Knowing the actual dimensions helps prevent costly sizing mistakes.
Step 4: Calculate Linear Feet
Many DIY projects use linear feet to estimate material requirements.
The formula is simple:
Linear Feet = Total Length of All Boards
For example:
Four boards measuring 8 feet each
Calculation:
4 × 8 = 32 linear feet
Linear measurements are especially useful for:
Accent walls
Trim
Baseboards
Slat walls
Shiplap
Fence boards
Step 5: Calculate Board Feet for Hardwood
Hardwood lumber is often sold by the board foot.
The standard formula is:
Board Feet = (Thickness × Width × Length) ÷ 144
Where:
Thickness = inches
Width = inches
Length = inches
For example:
A board measuring:
1 inch thick
8 inches wide
96 inches long
Calculation:
(1 × 8 × 96) ÷ 144 = 5.33 board feet
Knowing this calculation helps when purchasing hardwood from specialty lumber suppliers.
Step 6: Account for Waste
Even experienced woodworkers allow for waste.
Extra material covers:
Saw kerf
Natural defects
Grain matching
Incorrect cuts
Damaged boards
A good guideline is to purchase:
10% extra for simple projects
15–20% extra for projects with complex layouts or decorative patterns
Planning for waste helps avoid interruptions if mistakes occur.
Step 7: Consider Grain Direction
If appearance matters, you may need additional lumber to maintain consistent grain.
Projects that benefit from grain matching include:
Dining tables
Cabinet doors
Floating shelves
Wall paneling
Custom barn doors
Ordering a little extra gives you flexibility to create a more seamless, professional look.
Step 8: Choose the Right Board Lengths
Buying the longest boards isn't always the most economical option.
Instead:
Compare different board lengths.
Arrange your cut list efficiently.
Minimize offcuts.
Sometimes combining shorter boards results in less waste and lower overall cost.
Step 9: Think About Future Maintenance
If you're using premium hardwood or a wood species with distinctive grain, consider purchasing one extra board.
This spare board can be useful later for:
Repairs
Future modifications
Matching replacement pieces
Additional shelving
Having matching material available can save time if your project changes.
Step 10: Double-Check Before Ordering
Before purchasing your lumber, review:
Measurements
Wood species
Thickness
Width
Length
Quantity
Hardware requirements
Finish materials
A final review can prevent expensive ordering mistakes.
Example Lumber Estimate
Imagine you're building three floating shelves.
Each shelf measures:
48 inches long
10 inches deep
1½ inches thick
You'll also need hidden supports and mounting cleats.
Your material list might include:
Three shelf boards
Three mounting cleats
One extra board for waste and grain matching
Preparing a complete material list before shopping makes ordering much easier and helps ensure nothing is overlooked.
Should You Buy Extra Lumber?
In most cases, yes.
Buying a little extra helps account for:
Cutting mistakes
Wood defects
Grain selection
Future repairs
The small additional cost is often worthwhile compared to delaying a project because you're one board short.
Tips for Reducing Lumber Waste
To maximize every board:
Draw a cutting layout before buying.
Group pieces by length.
Use offcuts for smaller parts.
Keep similar grain patterns together.
Measure twice before cutting.
Store leftover wood properly for future projects.
Efficient planning saves both time and money.
Common Calculation Mistakes
Forgetting Actual Board Sizes
Nominal lumber dimensions differ from finished sizes.
Always design using the actual measurements.
Ignoring Saw Blade Width
Every cut removes a small amount of material.
Factor this into projects with multiple precise cuts.
Not Including Waste
Ordering the exact calculated amount leaves little room for mistakes or natural defects.
Mixing Measurement Units
Use the same unit of measurement throughout your calculations to avoid errors.
Frequently Asked Questions
How much extra lumber should I buy?
For most DIY projects, purchasing 10–15% extra is recommended. More complex projects with intricate patterns may require additional material.
What is a board foot?
A board foot is a unit of volume commonly used for hardwood lumber. It represents a board measuring 1 inch thick, 12 inches wide, and 12 inches long.
Should I calculate using nominal or actual board sizes?
Always use the actual finished dimensions when planning and building your project.
Is custom-cut lumber easier for DIY projects?
Yes. Ordering lumber cut to your exact dimensions reduces measuring, cutting, and waste, making projects easier for beginners and saving time for experienced builders.
Conclusion
Calculating lumber accurately is one of the most important steps in any woodworking or home improvement project. By creating a detailed cut list, understanding board sizes, accounting for waste, and choosing the right wood, you'll avoid costly mistakes and make the building process much smoother.
Whether you're installing floating shelves, creating a decorative accent wall, building custom furniture, or crafting a custom barn door, careful planning ensures you purchase the right amount of lumber the first time. A few extra minutes spent calculating today can save hours of frustration